Submitted by Seema Kenney
Helen Ullman’s article, A TEMPLATE AND SUGGESTIONS FOR WRITING IN REGISTER STYLE IN MICROSOFT WORD, in the 2010 Winter issue of MASSOG is a great starting point for writing your family history using Microsoft Word. [1] Since they changed WORD somewhat dramatically with version 2007, suggestions are offered here to work with Helen’s article in the newer version of Word/Office.
Unfortunately, while many styles may be included in a document, the newer versions of Word do not give you a quick glimpse at the current style of a paragraph without a little prep work on your part.
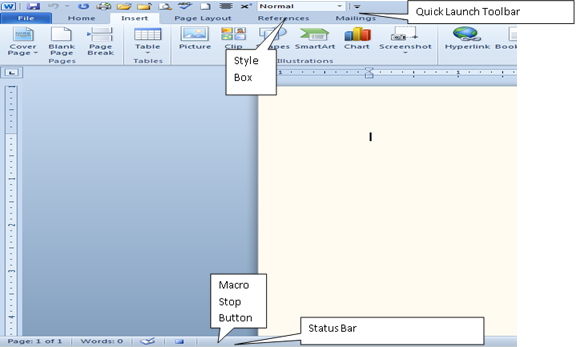
When Office 2007 or newer is first loaded, there is a very small toolbar above the ribbon. This is called the Quick Access Toolbar and upon installation includes four icons – save, undo, redo, and a drop down arrow. Clicking the drop down arrow at the far right provides access to the dialog box for customizing the Quick Access Toolbar. (This can also be opened from the Office Button or File Tab, depending upon the version of Word in use.) The option is labeled More Commands and is followed by an ellipsis (…), or three dots.
When teaching any Windows software I always tell the students to think of a phrase when you see the three dots – “Need More Information” – three words for three dots. This should remind you that the result of choosing this option will be a dialog box. And every dialog box comes with a safety net – a button labeled, ‘CANCEL’. The most common dialog box for a computer user is the Print Dialog box. When activated, it asks you questions such as, “What printer?,” “How many copies?,” “Would you like them collated?” These are the same questions a human might ask if you had someone going to the copy machine for you. However, if the questions in the dialog box are not understood, you have the safety net of clicking on the CANCEL button and returning to wherever you were previously. So, choose the More Commands… option with confidence that you can answer the questions that will follow!
The dialog box is really just asking you, in its own way, what features you would like as a shortcut on the Quick Access Toolbar. Add as many as you would like, but these directions will only deal with the one needed to use the Styles provided in Helen’s template. In the top drop-down on the left, choose ALL COMMANDS. In the long box on the left, scroll down to the options that start with the letters S-T to find one called STYLE. Double click on the STYLE option and it will be added to the bottom of the long list on the right, making it the right-most icon on your Quick Access Toolbar. Click OK in the lower right to close this dialog box.
You will now have a small ‘window’ on your Quick Access Toolbar that shows you the style you are currently using and allows you to drop down to select another style, such as ‘kids’, for your Register Style report of your family history. If you have the 2010 or 2013 version of Word and would like to more completely customize your access to various features, look for information on how to create your own ribbon of commands rather than being limited to one toolbar across your screen.
The other features of Word that are discussed in Helen’s article are Footnotes and Macros. Footnotes are now on the References Tab of the newer versions of Word, but work basically the same as outlined in the previous article. Click the References Tab, then Insert Footnote, and you will be at the bottom of the page, ready to insert your citation in Footnote Text style. However, if you would like to shorten these two mouse clicks, you can add this to your Quick Access Toolbar or Customized Ribbon as well, using the same steps as above.
If you are looking to create a macro in the newer versions of Word, Helen’s previous instructions are still quite valid. I am repeating them below, with the locations updated to match the interface of the newer versions of Word/Office:
a. Go to the View Ribbon.
b. Click the drop down arrow under “macro.”
c. Click on “record macro.”
d. Give it a name; “footnote” or “note” would be good.
e. Click on “keyboard.”
f. Tell it a shortcut key. “Alt-N” should work (make sure it’s unassigned).
g. Click on “assign,” then on “close.”
h. Now you are running the macro. Go to the References Tab and create a footnote by using the Insert Footnote as described above.
i. Click on the little square that is now displayed at the bottom of your screen on the status bar
j. When you want to create another footnote, just hit “Alt-N.”
Again, doing the same while including the steps of typing the square brackets around the footnote number would work the same way.
Using Styles has another advantage that was not mentioned in Helen’s previous article. By using a specific Style for your headings for each generation, Word will quickly create, and later update, a Table of Contents for you. For instance, if each generation starts with text in the Heading 1 Style as shown below:
Second Generation
The option at the left of the References Tab for Table of Contents will quickly read through your document, find all the lines in Heading 1 Style along with their page number, and create, preferably located at the beginning of your document, a Table of Contents. After you add or delete information, simply click on the Table of Contents and choose the ‘Update Table’ option at the left of the References Tab. Answer whether you want the entire table or just the page numbers updated, and Word will re-read your document and change the Table of Contents accordingly.
Seema Kenney (Seema@MassResearchers.com) is the owner of Technical Tutoring, a software training company, which offers on-site training classes to home PC users and small businesses. In addition, she is back to following her passion for genealogy in a big way and during her three years as a member of MSOG has held the position of Treasurer for the Worcester Chapter and is now the President of that chapter.
[1] The template is also found online at AmericanAncestors.org. Click on Publications and scroll down to the Register. Click on the title and look on the left side. Click on “Register style and submissions.” Then look below for “Register style template.” There are other helps there too. You do not need to be a member of NEHGS to get them.